|
||||||
|
||||||
Online Manual - GameplayDecaying Orbit may be played using the standard digital controller pad. The default buttons are shown here.  Thrust Thrust
 Fire Laser Fire Laser
 Use Extra #1 Use Extra #1
 Use Extra #2 Use Extra #2
 Cycle Extra #1
Cycle Extra #2 Cycle Extra #1
Cycle Extra #2
 Change Engine Priority
Change Laser Priority
Change Cooling Priority
Change Shield Priority Change Engine Priority
Change Laser Priority
Change Cooling Priority
Change Shield Priority
However, Decaying Orbit is best played with the Dual Shock analog controller. With the Dual Shock you use the left analog stick for steering. In this case the button configuration is identical to the digital pad above. Experts will want to play in Right Throttle mode. In this mode the left analog stick rotates your craft and the right analog stick thrusts. This allows for more precise control of your ship. The default button configuration for Right Throttle mode is as follows. Fire Laser
Use Extra #1
 Use Extra #2 Use Extra #2
 Cycle Extra #1
Cycle Extra #2
Change Engine Priority
Change Laser Priority
Change Cooling Priority
Change Shield Priority Cycle Extra #1
Cycle Extra #2
Change Engine Priority
Change Laser Priority
Change Cooling Priority
Change Shield Priority
To enable Right Throttle mode, or to change the buttons from their defaults, you must enter the Control Config Menu. The menu system is described here.  Your goal on each level is to destroy enough enemies to open the target planet. Landing on the target will end the level. At the start of each level you will be on the "home" planet which is denoted by the green triangles. Press left/right to rotate around the planet and choose your launch angle. Then press the thrust button (or in the case of right-analog-mode press the right stick forward) to launch from the planet. The levels are littered with objects which influence your craft in various ways. Planets will pull you. Nebulas will push you, slow you down, speed you up, or have other effects. For descriptions of the various objects you will encounter in each galaxy, visit the levels page. Enemy emplacements will try to destroy you along the way. These turrets don't move around, but do pack a punch. Destroy enough of them and the level exit will open. Each turret will give off some credits when destroyed. These will float around the level until you pick them up. Be sure to collect as many as you can since you can use the credits to purchase system upgrades for your craft. In addition to credits, other bonuses may lurk... Once you've destroyed the appropriate enemies you will hear a sound letting you know a target has opened. If the target planet is on the screen you will see red arrows surrounding it. IMPORTANT: Landing is not as simple as merely hitting the target planet. You must slow down to ensure a safe landing. If you are flying too fast you will skip off just like hitting any other planet. Flying off the edge of the playfield will lose the level and you will have to start again. If you fly too close to the edge a yellow triangle will appear, telling you where your craft is even if you can't see it. As you get closer to the edge, the triangle goes from yellow to red, until finally your craft's navigation system gives out and you become lost in the stars. There is a thin guardband around the edge of each level to give you a chance to get back in the level before flying off the edge. Your craft is equipped with five systems:
As you upgrade your craft it is important to maintain a balance amongst the various systems. If your Energy System does not produce enough resources for the other four components you may find the delay between laser shots too long. Or it may take an excrutiatingly long time to recharge your shield. Under typical conditions your craft's Energy System will distribute energy evenly between your other four systems. There may be times, however, when you need to increase performance for a particular system temporarily. You can cycle any system's priority through three levels: low, medium, and high. At the start of each level the priority for each system is set to medium. By pressing the appropriate button (see the controller configuration to find out which button) you cycle the system through the three levels. You may do this before launching from your home planet. You can also change priority during gameplay while flying about. Be warned! Changing a system's priority during the game will deactivate that system for a few seconds while the change is taking effect. During that time no energy will flow to the system. Therefore it is not advised to change the laser system priority during an intense firefight. Note that the amount of energy given to each system is based on the relative priorities of ALL systems. So changing one system's priority will affect the amount of energy given to the other three systems as well. (i.e. changing the Laser System from HIGH to LOW will decrease the energy given to the lasers, but it will also INCREASE the energy given to the other three systems) 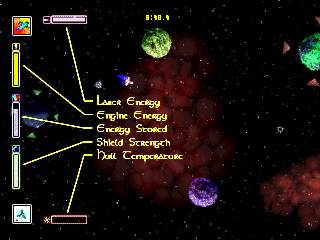 Your Heads-Up-Display (HUD) gives useful information about your craft's systems. It shows the energy levels for each of the five systems. Your laser power is shown at the top in purple. Your available thrust is in yellow at the left near the top. Total system energy is at middle-left. Shield strength is left near the bottom. The hull temperature is at the bottom of the screen. Watch these guages carefully. If your hull temperature gets too high your craft will explode. In that case, consider bumping up the priority to the Cooling System to dissipate the heat faster. Also, if your shield energy is getting low consider increasing the priority to the Shield System. Your HUD tells you each system's priority. If a system icon has a single, thin line around it then it's at MEDIUM priority. A thick line means HIGH priority. No line at all denotes LOW priority. These same icons will appear around your craft when you change a system priority. At the middle of the screen at the top is a indication of how much time you have left on the level. When time expires you explode and must play the level again. You gain more time by destroying enemies or activating beacons (see below for an explanation of beacons). 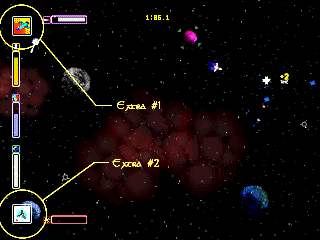 In addition to the five systems, your craft can be equipped with a number of extra systems. These "extras" can have a variety of effects, such as simple missiles and rockets, to a gravity nullifier and quick system changer. Some extras take effect automatically (like the gravity nullifier or quick system changer). Others must be activated to take effect. While your craft can hold up to 6 extras, you may only have 2 available at any one time. The boxes in the top-left and bottom-left corners show which extras are available. Pressing the appropriate button will activate the extra (see the button configuration in the pause menu). You can cycle through your available extras by pressing the Cycle Extra button (again, see the button configuration). Some extras, such as homing missiles, require a target lock in order to fire. To acquire a lock, first make sure you have the missile selected in one of the HUD's two extra boxes. Then whenever you hit an enemy with your laser, a targeting box will appear around it. Press the missile-fire button once to lock onto the target. Then press the button again to fire the missile. The lock will be maintained until you manually release it (by pressing the Cycle Extra button), or when you fly too far away from the target. You can find beacons strewn throughout each level (except the first). At the start of the level they are turned off. You activate them by either flying near one or by shooting it with a weapon. Activating beacons increases your available time by 2 seconds. This makes it easier to satisfy the Time Bonus (see below), but be careful you don't go more than 2 seconds out of your way to activate one. If you can activate all beacons in a level and then complete the level you will receive bonus credits. Bonuses are explained below.
Top |
||||||